
Table of Contents
Google Search Console, previously recognized as Google Webmaster Tools, provides a complimentary platform for website owners to keep tabs on how Google perceives their site and improve its natural online presence. This encompasses monitoring referring domains, assessing mobile site performance, examining rich search results, and identifying the queries and pages that generate the highest traffic levels.
Steps for registering Google Search Console Login
- Sign in to your Google account, ensuring you’re logged in with your business account, not your one, if the website is associated with your business.
- Head to Google Webmaster Tools and click the “Add a property” option.
- Opt for “Website” from the drop-down menu and type in the precise URL of your website as it appears in the browser’s address bar.
- To proceed, click the “Continue” button.
- Select one of the available methods to verify that you are the rightful owner of your website. You have several options, such as uploading an HTML file, working with your domain name provider, adding an HTML tag, including a Google Analytics tracking code, or integrating a Google Tag Manager (GTM) container snippet.
- If you can access your website via both HTTP and HTTPS, ensure that you verify ownership for both versions.
From the moment you include your property in Google Search Console, Google begins tracking data for it, regardless of whether the site ownership has been verified.
Site Verification Process in Google Search Console
Verification of site or app ownership is required to access privileged information regarding their performance and to exert control over Google’s crawling process.By undergoing verification, a specific user gains control over a particular property. Having at least one verified owner associated with each GSC property is required.
It’s worth noting that confirming ownership of your property in Google Search Console does not impact your PageRank or how well your website fares in Google search. While you can utilize the information from Google Search Console to devise strategies for achieving a higher search ranking, it’s important to emphasize that adding your website to the console itself does not automatically increase your search rankings.
Methods for Validating GSC (Google Search Console) Data
HTML file upload: Upload an HTML verification file to a specific location on your website.
Domain name provider: Log in to your domain registrar account (such as GoDaddy, eNom, or networksolutions.com) and verify your website through Google Search Console or by adding a DNS TXT or CNAME record.
- HTML tag: Insert a <meta> tag into the <HEAD> section of a particular page’s HTML code.
- Google Analytics tracking code: Duplicate your website’s Google Analytics tracking code. (You must have “edit” permissions in Google Analytics to perform this step.)
- Google Tag Manager container snippet code: Copy the tagger container snippet code linked to your website. (You need “View,” “Edit,” and “Manage container-level permissions” in Google Tag Manager for this option.)
Verification is automatically handled for Google-hosted sites, such as Blogger and Sites pages.
URL Versions: With or Without WWW Domain?
Fact Check: Are Shrushti.com and www.shrushti.com the same? The answer? False! Despite the visual similarity, these URLs are technically distinct domains.
However, the magic happens here: inputting “shrushti.com” in your browser will seamlessly lead you to “www.shrushti.com.”
The secret lies in Shrushti Digital Marketing’s choice of “www.shrushti.com” as its preferred, or canonical, domain. This choice instructs Google to showcase all their URLs in search results as “www.shrushti.com/……”.
Furthermore, when external parties link to their pages, they should employ “www.shrushti.com/……” as the URL. Failure to specify your preferred domain in Google Search Console (GSC) may compel Google to treat the www and non-www versions as distinct entities, potentially causing a division in page views, backlinks, and engagement – a scenario to avoid.
(Remember to establish a 301 redirect from your non-preferred domain to your preferred one if you still need to.)
GSC Access Levels and Authorization: Users, Owners, and Their Rights
GSC encompasses two role classifications. While the data aspect is enticing, it’s vital to establish this correctly.
Ownership Privileges:
Within GSC, owners exercise complete control over their properties, entailing the authority to add or remove other users, customize settings, view all data, and access the full suite of tools.A verified owner signifies an individual who has successfully undergone the property verification process, while a delegated owner is someone designated by a verified owner. (Delegated owners also possess the capability to appoint additional delegated owners.)”
User Types:
Users within the system are categorized into different types. A standard user can access all available data and perform specific tasks but needs more authority to introduce new users. Total users, conversely, enjoy greater access, encompassing the ability to view most data and engage in diverse actions, while restricted users are confined to viewing most data.
Thoughtfully assess which permissions should be assigned to each person. Granting unrestricted ownership to all can result in potential mishaps, particularly the accidental modification of crucial configurations. Instead, aim to empower your team members with just the necessary level of authority and no more than that.
A third role, ‘associate,’ is crucial in integrating a Google Analytics property with a Search Console account. This integration facilitates the display of Search Console data within Google Analytics reports. Moreover, you can conveniently access Google Analytics reports in two specific sections of the Search Console: ‘links to your site’ and ‘Sitelinks’.
Do You Require a Sitemap?
A sitemap is generally optional for your web content to appear in Google search results. If your website is structured correctly and the pages are logically linked, Google’s web crawlers tend to find and index most of your pages.
However, there are four scenarios in which a sitemap can enhance the crawlability of your website.With a substantial number of pages on your site, there’s an increased risk that Googlebot might not detect modifications or fresh content.
A website featuring many ‘isolated’ pages, i.e., pages with minimal inbound links from other pages, can create difficulties for web crawlers regarding discovery.Newly created websites often suffer from reduced discoverability due to lacking backlinks connections from other websites.
A sitemap plays a pivotal role when your website boasts rich media assets or is prominently featured on Google News. It simplifies the task for Google to structure and showcase your site in search results with improved formatting and visibility.
Once you have constructed your sitemap, use the GSC sitemaps tool for submission.
Google Search Console Sitemap Insights
When Google has processed and cataloged your sitemap, it will be accessible through the Sitemaps report. In this report, you can monitor the date of Google’s most recent review of your sitemap and view the quantity of URLs included in its index.
Ready to Chat About
A Comprehensive Guide To Google Search Console In 2023
Drop us a line today!
Google Search Console's Metrics and Dimensions
What does the term 'Google Search Console query' refer to?
In this context, a ‘search term’ signifies a phrase that led to your web pages receiving visibility on a Google Search Engine Results Page (SERP). It’s worth mentioning that query data is exclusively accessible through Search Console, and Google Analytics does not provide this information.
What is meant by "impression"?
When we talk about impressions in the context of search results, we’re referring to the number of times a link URL is displayed in those results. It’s important to note that these impressions are tallied regardless of whether the user scrolls down to see the search result.
How is a "click" defined?
In Google Search, a “click” is registered when a user chooses a search result link that leads to an external webpage. The counting of clicks remains consistent even if the user first clicks the link, returns to the search results, and then clicks the same link again. If they proceed to click a different link, the count increases to two clicks.
It’s important to note that when a user clicks on a link within Google Search, causing a new search query to be performed, such clicks are not factored into the overall click count. Moreover, this exception extends to paid results on Google.
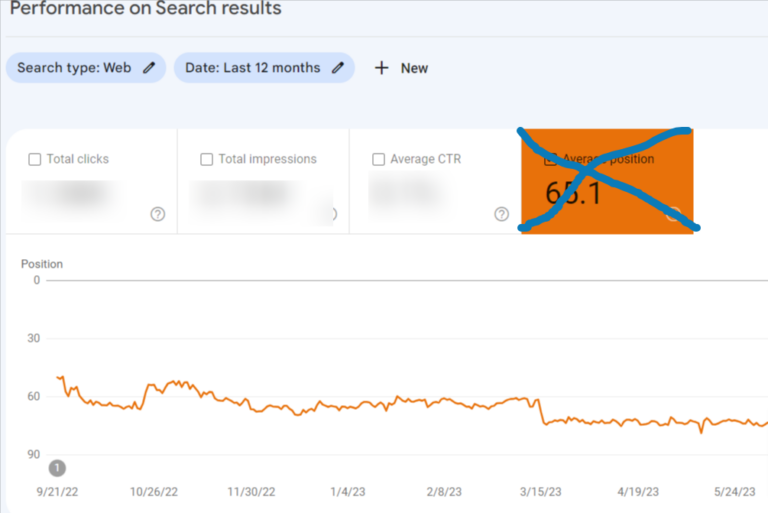
What is meant by "average position" in the realm of SEO?
In the context of SEO, “average position” denotes the mean ranking of a webpage for specific search queries. For example, if a web page is ranked #2 for “SEO software” and #4 for “keyword tools,” its average position, when considering no other rankings, would be 3.
What does CTR stand for?
CTR, short for click-through rate, is a metric used in online marketing to measure the effectiveness of a link or post. It’s calculated by dividing the number of clicks by the number of impressions and multiplying by 100. For instance, if a post is exposed to 20 searches and gets 10 clicks, the resulting CTR would be 50%.
Maximizing Google Search Console's Potential with Filters
In Google Search Console (GSC), multiple methods exist to filter and dissect your data, which can prove extremely useful. Nevertheless, these filtering options might appear complex as you become more acquainted with the tool.
Search Type:
Three search categories exist: web, image, and video:
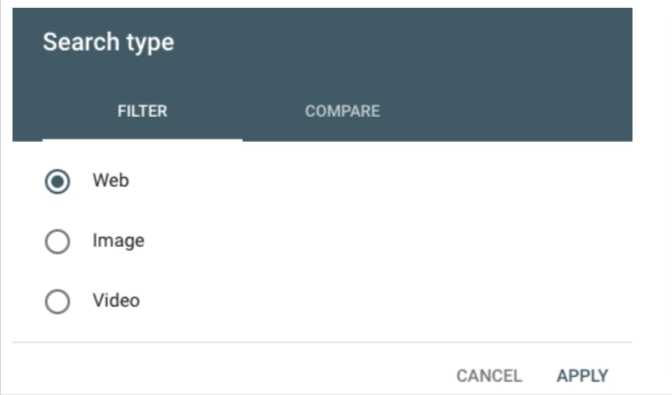
“Furthermore, you can perform a comparison between two traffic categories. All you need to do is click on the ‘Compare’ tab, select the two categories you wish to analyze, and then click ‘Apply.’
Data Range
he data history in GSC has been prolonged to encompass a generous 16-month period, a substantial enhancement over the prior 90-day limit. You can choose from preset periods or set up a custom timeframe according to your preferences.
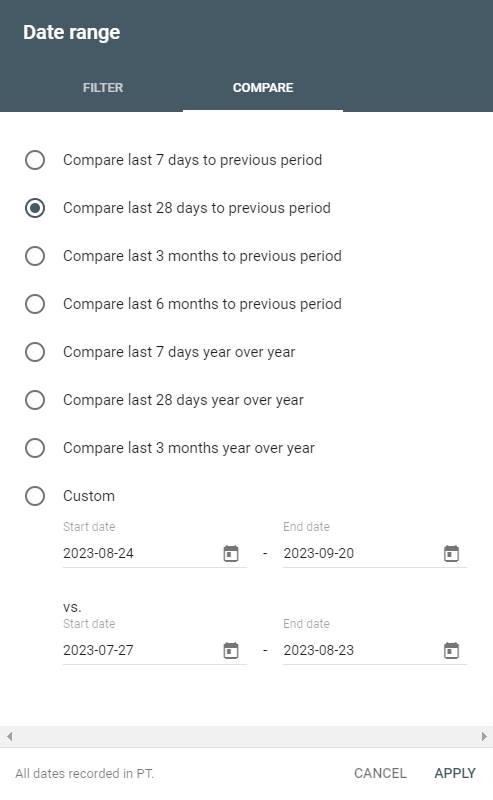
In the same vein as choosing a search type, you can also compare two date ranges within the ‘Compare’ tab.”
Queries, Page, Country, Device, Search Appearance
“By clicking ‘New’ adjacent to the Date filter, you can incorporate up to five other filter categories like query, page, country, device, and search appearance.”
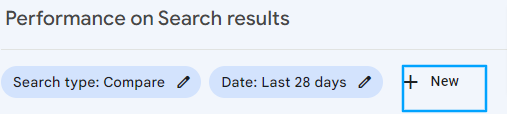
You have the option to layer these filters. For instance, if I wanted to examine data related to SEO queries, specifically on mobile search, I could apply a filter for queries containing the term “SEO” on mobile devices. If I wanted to narrow down the results, focusing solely on posts from the Marketing Blog, I could introduce an additional filter for pages with the URL “blog.shrushti.com/marketing.”
Index Coverage Report
In the index coverage report, you can assess the condition of each page that Google has attempted to index on your website. This report is invaluable for pinpointing and resolving indexing issues. Each page is allocated one of four status categories:
- Indexing Error: The page could not be added to the index.
- Indexing Warning: The indexed page has encountered an issue.
- Page Excluded: This alternate page duplicates content from a canonical page and has been deliberately excluded, with the canonical page successfully indexed.
This is the moment to delve into the details, so I encourage you to experiment with different filter combinations to uncover the breadth of options available.
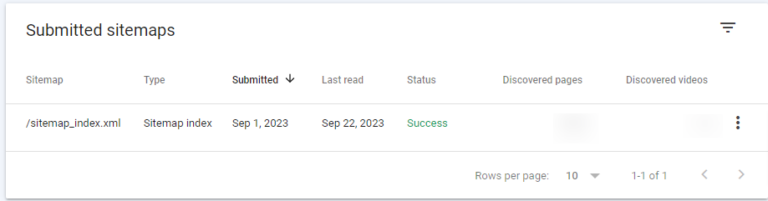
Submitted Sitemaps
This section allows you to provide Google access to your sitemap and track its status.
What are the steps to make the most of Google Search Console?
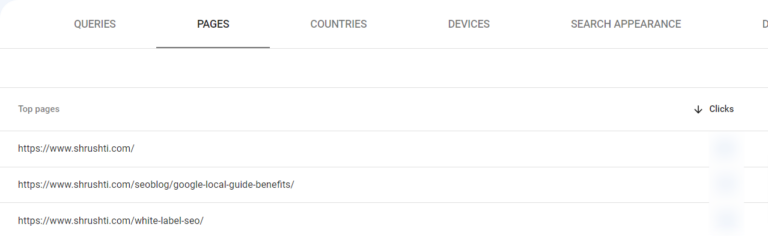
1. Find out which pages on your website attract the most visitors.
- Choose “Performance” from the options.
- Go to the “Page” section (found next to Queries).
- Choose “Last 12 months” as the date range.
- Verify that “Total clicks” is the active selection.
- Click the small downward arrow adjacent to “Clicks” to arrange them from highest to lowest.
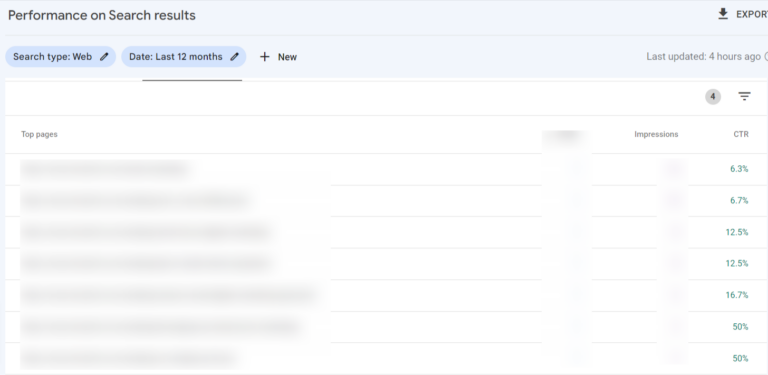
2. Identify Queries with the Highest Click-Through Rates (CTR)
- Go to Click Performance within your analytics dashboard.
- Access the “Queries” section.
- Customize the date range to cover the past 12 months, but feel free to tweak it to your liking.
- Double-check that “Average CTR” is your chosen metric.
- Use the small downward arrow adjacent to “CTR” to sort the data, arranging it from the highest to the lowest.
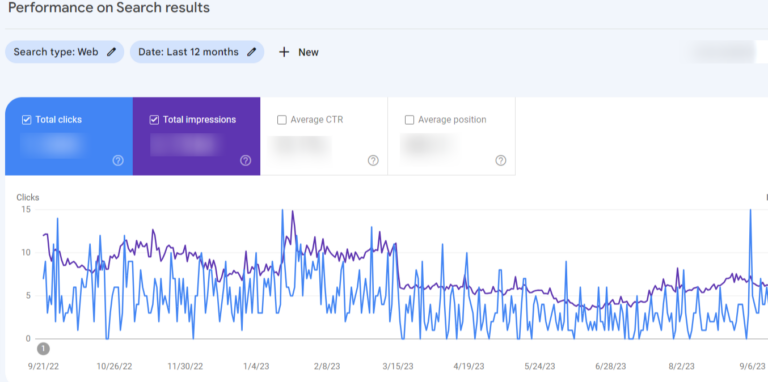
3. Examine the Average CTR
- Choose ‘Performance
- Adjust the period by clicking on the date and choosing the range that suits your needs.Alternatively, you can analyze two date ranges together by clicking ‘Compare.
- Examine the data for ‘Total impressions’
- Click on ‘Status’, and then select ‘Performance’.
- Adjust the period by selecting your desired range when you click the date. Or, choose the ‘Compare’ option to analyze two date ranges simultaneously.
- Review the data related to ‘Average position.’
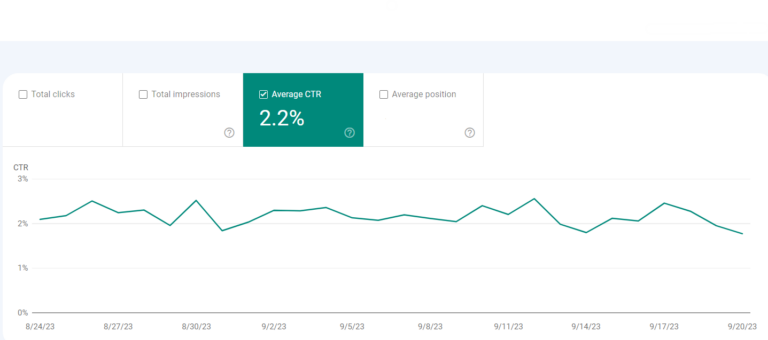
4. Continuously observe how your CTR changes over time.
It’s advisable to keep a watchful eye on your CTR. Any significant changes carry meaning: If CTR decreases while impressions rise, you’re ranking for a broader set of keywords, leading to a lower average CTR. In contrast, increasing CTR while impressions decrease suggests a loss of keywords. If both CTR and impressions increase, you’re likely executing a successful strategy!
5. Keep track of your impression count as time progresses.
With more content creation and ongoing optimization of your existing pages, this metric should show an upward trend. (Of course, there can be exceptional cases, like when your strategy involves concentrating on a limited set of highly converting keywords rather than a wide range of moderately performing ones, or if you’re emphasizing other marketing channels, etc.)”
6. Keep a constant watch on how the average position progresses over time.
The average position could be more informative when viewed at a higher level. Most people become concerned when it improves, but this viewpoint may lack depth. When a page or a set of pages starts ranking for additional keywords, it’s common for the average position to rise. Unless you consistently rank in the same or higher positions for your existing keywords, your ‘average’ position will tend to increase. Don’t overly focus on this measurement.
7. Discover which pages have the top rankings.
- Click on the “Performance” option.
- Navigate to the “Page” tab and click it.
- Set the date range to “Last 28 days” to obtain a recent and precise snapshot of your pages for accuracy.
- Double-check that “Average position” is the current selection.
- Use the upward-facing arrow located near “Position” to arrange it from best (lowest) to worst (highest).
When viewing the average position by URL, this number signifies the typical ranking for that particular page, considering all its rankings. To put it differently, even if the page ranks #1 for a high-traffic keyword and #43 for a low-traffic one, the average will still be
Remember that you shouldn’t solely evaluate a page’s effectiveness or inadequacy by relying on the “average position.”
8. Find the pages that have the lowest positions.
Follow the same procedure you used to locate your highest-ranking pages, but this time, adjust the sorting of the “Position” column by clicking the small upward arrow to display your lowest-ranking pages, from highest (least desirable) to lowest (most desirable).
9. Find out which rankings have gone up and which ones have gone down.
- Access the “Performance”
- Click on the “Query” tab
- Adjust the date range by clicking “Date range” and then switch to the “Compare” tab.
- Select two time periods that match and finalize your choice by clicking “Apply.”
You can view the data in GSC or export it at this stage. To conduct a more thorough analysis, I highly suggest going with the latter option as it will streamline your tasks considerably. To complete this task, click the downward arrow under “Search Appearance,” then choose to download as CSV or export to Google Sheets.
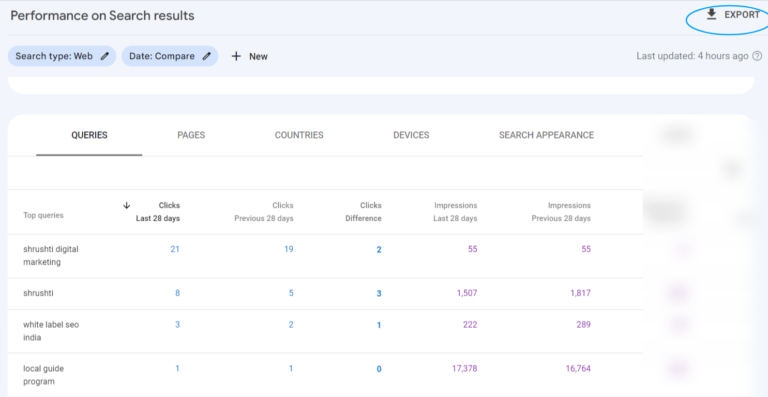
With the data in spreadsheet format, you can create an additional column to compute the position variances (Last 28 days Position – Previous 28 days Position) and then sort them based on their values.
If the difference is positive, it signifies that your site has made progress in ranking for that query. Conversely, a negative difference implies that your site’s position has declined.
10. Determine the queries that bring in the most web traffic.
- Begin by clicking on Performance.
- Proceed to the “Query” tab.
- Choose your desired period using the “Date range” option.
- Confirm that “Total clicks” is the selected metric.
- To finalize the process, click the small downward arrow next to “Clicks” to arrange them from highest to lowest.
It’s highly advantageous to know which queries drive the most search traffic.You can explore opportunities like optimizing high-ranking pages for better conversion rates, keeping them up to date to maintain their positions, allocating paid promotion resources, leveraging them as links to equally important lower-ranked pages, and so forth.
11. Evaluate the performance of the search function on your website when accessed through desktop, mobile, or tablet devices.
- Select Performance Tab.
- Navigate to the “Devices” section.
- Ensure the “Total clicks,” “Total impressions,” “Average CTR,” and “Average Position” metrics are chosen.
- Analyze and contrast your performance across desktop, mobile, and tablet.
12. Evaluate the search performance of your site across multiple countries.
- Start by clicking on the performance
- Proceed to the tab labeled “Countries”.
- Make sure that you’ve checked the boxes for “Total clicks”, “Total impressions”, “Average CTR”, and “Average Position”.
This allows you to make a comparative analysis of your performance in different countries.
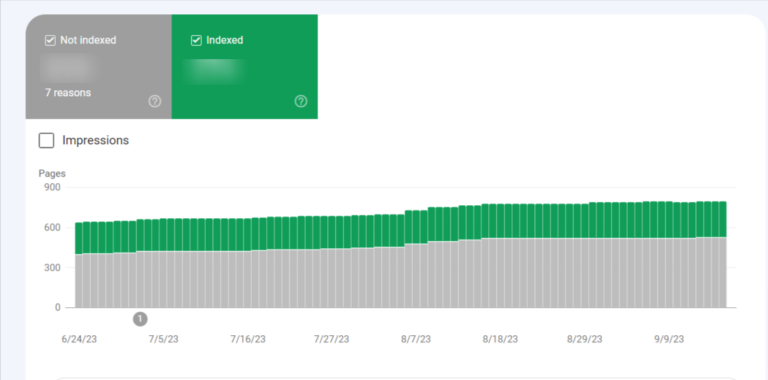
13. Ascertain the count of your indexed pages.
- Begin your journey from the ‘Overview’.
- Continue your scrolling down to find the ‘Index coverage summary’.
- Don’t miss to check the count of ‘Valid pages’.”
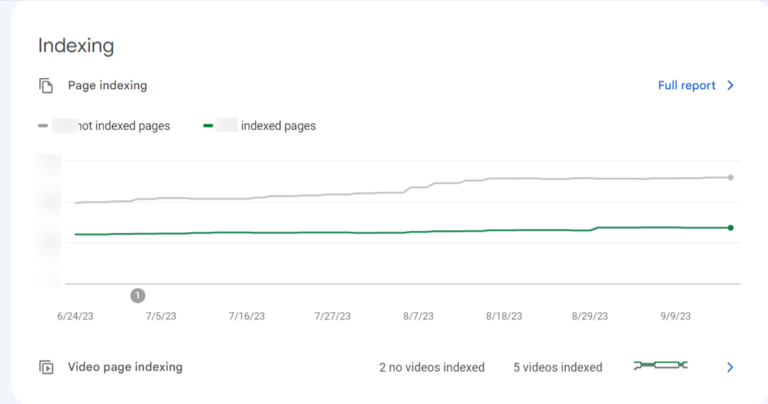
14. Find out which pages are not indexed and the rationale for this situation.
- Start by heading to the ‘Overview’, then ‘Index coverage’.
- Find out what Errors are causing the indexing troubles and how often they occur by checking the Details box.
- Get a list of page URLs affected by any Error type by double-clicking on it.
15. Keep track of the total count of indexed pages and any errors that occur during indexing.
- Proceed to the “Overview”, then “Index coverage”.
- Make sure that “Error”, “Valid with warnings”, “Valid”, and “Excluded” are all ticked.
The quantity of indexed pages on your website is expected to rise with time as you engage in activities such as:
- Publishing fresh blog articles
- Developing new landing pages
- Introducing extra pages to your site, and so on.
- Rectifying indexing mistakes.
Suppose you observe a considerable surge in indexing errors. In that case, it might indicate that there has been a modification to your site’s template, affecting a large cluster of pages simultaneously. Another possibility could be the submission of a sitemap that includes URLs that are not crawlable by Google, either due to ‘noindex’ directives, robots.txt, or password-protected pages.
If you notice your site’s total indexed pages dwindling without a corresponding uptick in errors, it could suggest that you’ve inadvertently obstructed access to some URLs.Analyzing the pages you’ve disregarded could provide insight into the issue at hand and offer some leads.
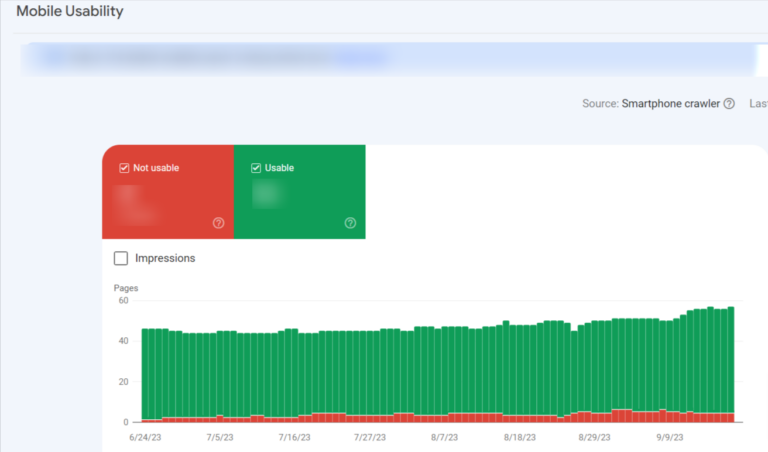
16. Determine usability problems in mobile interfaces
- Proceed to Mobile Usability and confirm that the “Error” category is selected.
- Inspect the Details section to understand the Errors causing mobile usability problems and their occurrence rate.
- To see the URLs of the implicated pages, double-click any Error type.

17. Determine the total backlink quantity for your website
- Begin by clicking on the Links option.
- Open up the report named Top Linked Pages.
- Observe the box that is marked as “Total external links.”
- Use the dropdown arrow next to “Incoming links” to sort the backlinks from highest to lowest.
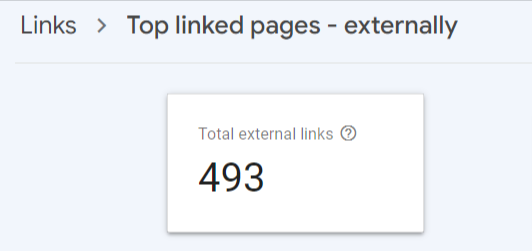
Each backlink represents a message to Google, indicating the reliability and usefulness of your content. As a general rule, having more backlinks is advantageous. However, it’s crucial to remember that the quality of these links is paramount; a solitary link from a high-authority site holds significantly more value than two links from low-authority sites. To identify which websites refer to a particular page, double-click on the report URL.
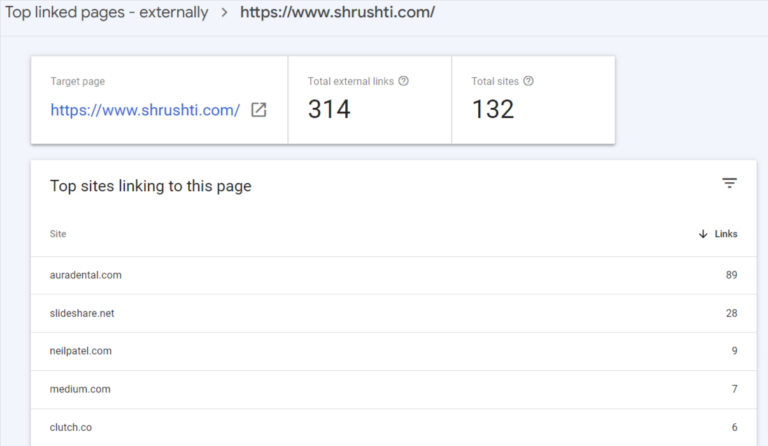
18. Determine the URLs with the highest number of backlinks
- Choose “Links”.
- Open up the “Top linked pages” report.
- To arrange “Incoming links” from most to least, click on the downward-pointing arrow.
When aiming to improve the ranking of a specific webpage, it’s a wise strategy to include a link from a page rich in backlinks. These backlinks endow the linked URL with substantial page authority, which it can then convey to another page on your site via the link.
19. Identify the web pages that link to your site most frequently.
- Navigate to ‘Links’
- Scroll further to ‘Top linking sites,’ and click on ‘More.'”
Being aware of your most significant referring domains is valuable for promotional activities. I recommend initiating your link-building campaigns by focusing on these sites. However, using tools like Moz, SEMrush, or Arel=’noopener’ target=’_blank’ hrefs is crucial to filter out the low-authority ones.
Consider these as potential options for co-marketing endeavors or establishing partnerships through social media.
20. Find out which anchor text is the most common for external link references.
Go to the ‘Links’ tab and scroll until you reach ‘Top linking text.’ To see more information, select ‘More.'”
The ideal approach for anchor text is to make it highly descriptive and, if applicable, include your designated keyword. If you encounter instances where other websites are linking to your web pages using generic anchor text such as “Click here,” “Learn more,” or “Check it out,” it’s a good idea to send them an email requesting a revision of the hyperlink for better search engine optimization.
21. Determine which pages possess the highest number of internal links
Click on the hyperlinks, scroll further down the page, and click “More” under the “Top linked pages” section to view additional information.
It’s perfectly normal for specific URLs to attract more inbound links. Take, for instance, a recipe website, where various recipe pages link back to the main recipe categories. This serves a valuable purpose by indicating to Google that your primary URLs carry significant weight, thus enhancing their chances of ranking higher in search results.
22. Calculate the total internal links within your website.
Click on the “Links” tab, proceed to scroll down to the “Top linked pages” section, and then select “More.” In this section, look at the box “Total internal links.”
23. Identify and rectify issues associated with AMP.
- Navigate to the AMP section.
- Confirm that you’ve opted for “Error” as the filter.
- Scroll down to the “Details” box to observe the types and frequency of the issues that need attention.
Google suggests tackling errors before delving into pages categorized as “Valid with warnings.” The default sorting of errors considers their severity, how often they occur, and whether you’ve already implemented fixes.
24. Get insight into how Google interprets a URL.
Utilize the white magnifying glass icon positioned at the page’s top and input the page’s URL. Be sure that the URL pertains to the property you are presently viewing.
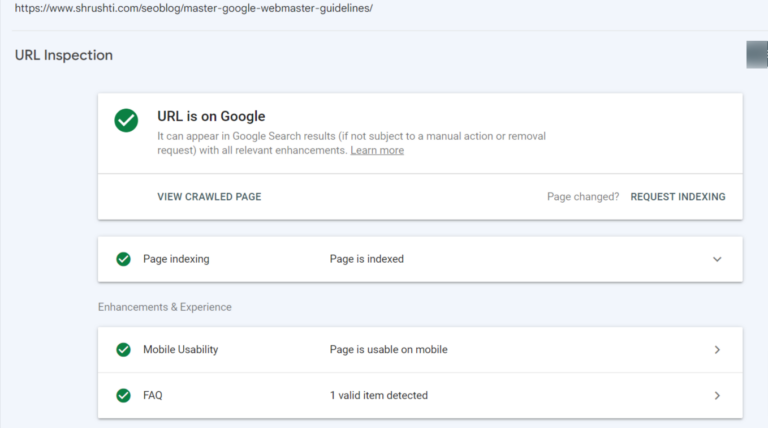
To interpret the findings, if you can see the URL on Google, it has been indexed and can be displayed in search results.
Remember that its presence in the index doesn’t guarantee it will appear in search results. It won’t be displayed if the URL has been labeled as spam or if you’ve removed or temporarily blocked the content. To check its visibility, perform a Google search for the URL; if it shows up, it means searchers can access it.
For a more comprehensive view of the URL’s status on Google, navigate to the Index coverage card. Here, you’ll discover critical information, including which sitemaps reference this URL, the referring page that led Googlebot to it, the most recent crawl date, whether you’ve permitted Googlebot’s crawl, Googlebot’s success in fetching the URL, any indexing restrictions, the canonical URL you’ve defined, and Google’s choice for the canonical representation of this page.
The Enhancements section provides insights into whether an AMP version of the page is available, including any issues specific to AMP and the status of structured data for job postings and recipes.
About the Author

My name’s Semil Shah, and I pride myself on being the last digital marketer that you’ll ever need. Having worked internationally across agile and disruptive teams from San Fransico to London, I can help you take what you are doing in digital to a whole next level.