

Table of Contents
Whenever we browse the web, we all encounter errors from time to time. Error 404 is an example of an easily understood error code. Some, such as “This site can’t be reached,” are considerably less specific and do not provide any helpful advice.
Google Chrome may display the error “This site can’t be reached” for several reasons. The troubleshooting method(s) you use will depend on what the underlying causes are, so knowing what they are will enable you to solve the issue.
The purpose of this article is to explain why “This site can’t be reached ”. We will then discuss five possible solutions.
Come on, let’s do this!
The error "This site can’t be reached" is caused by:
Chrome is not always clear as to what is causing the “This site can’t be reached” error. Additionally, a warning message may be accompanied by a wide variety of error codes.
When your connection times out or you encounter the following error, you will see the same message,
ERR_CONNECTION_RESET code:
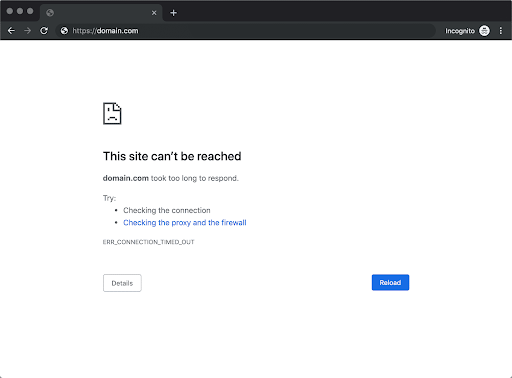
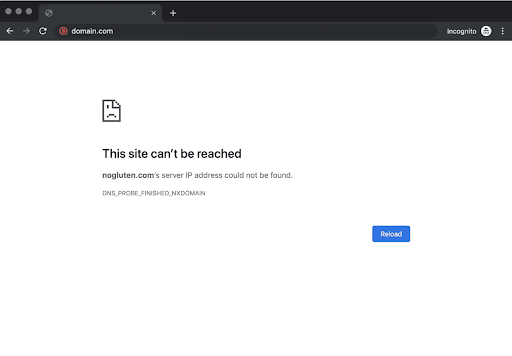
“This site can’t be reached” seems to serve as Chrome’s catch-all error message for the majority of errors. Common causes of errors include:
- An error occurred when resolving a domain name system (DNS)
- A timeout on a connection
- Internet connectivity is down for an extended period of time
- Internet, firewall, or network settings misconfigured
You can fix this issue in a variety of ways, though Chrome does offer a few suggestions within every error screen.
This site cant be reached: 5 Easy Fixes
Here’s how to fix the “This site can’t be reached” error. To begin, let’s check your connection to see if it’s the problem.
1. Connect your computer to the Internet and restart it
When there’s an error with a site, it can still display the “This site can’t be reached” message even if you have a working internet connection. Restarting your modem or router can usually solve this problem quickly, even though it may seem too simple.
This is usually the first solution you should try because it only takes a minute or two to restart your connection. It is usually recommended that you disconnect and wait a full minute before reconnecting your router’s power cable. Try accessing the website once it has been restored. Once your internet connection has been restored, wait a few moments, and then try again.
2. Remove your antivirus and firewall
Ready to Chat About
How to Fix the “This Site Can’t Be Reached” Error
Drop us a line today!
Most operating systems are pre-installed with a firewall that – regardless of which software you use – is capable of blocking pages aggressively and preventing your computer from connecting to them. You can find out for sure if this is the issue by temporarily disabling both your firewall and antivirus software, and then try the site again.
Depending on the tool you use, you’ll need to change your settings to disable your antivirus software. Unless the website is truly dangerous, we don’t typically see firewalls blocking you from loading websites.
Then it’s time to try a different approach after disabling your firewall and antivirus software. Before moving on, activate them both again.
3. Empty the browser cache
The websites you visit are stored by Chrome in the form of files and data. This saves you the time of reloading sites every time you visit them because your browser stores those files locally.
It is possible for your cached files to be the cause of the “This site can’t be reached” error. Your browser’s cache will need to be cleared.
Chrome users, navigate to Settings then hop onto Privacy and Security and finally Clear Browsing Data and check the Ignore Cached Data option:
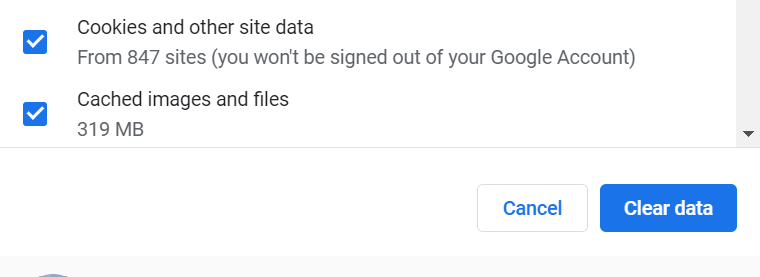
Chrome’s cache of images and files can be cleared.
It’s as simple as clicking on Clear Data. When Chrome finishes doing its thing, try reloading the site that was giving you trouble.
4. Remove the DNS cache
Many websites you visit store data on your operating system. Similarly, the DNS cache provides your browser with IP addresses so that you don’t have to look them up every time a connection is established.
DNS caches are similar to browser caches in the sense that they store different types of data, but they store different types of information.
This feature is a terrific time saver for every user. In this case, however, your OS may also cache outdated information for a website, causing errors. A DNS cache reset will be necessary in that case.
DNS cache flushing is much easier than you think. Visit our full DNS caching tutorial, where we cover all the major operating systems and browsers. We’ll cover changing DNS servers in the next section if this does not work.
Is your WordPress site giving you problems?
Drop us a line today!
5. Make sure your DNS is updated
The DNS servers for your connection are automatically assigned by your ISP. A set of DNS servers can, however, be configured in your internet settings.
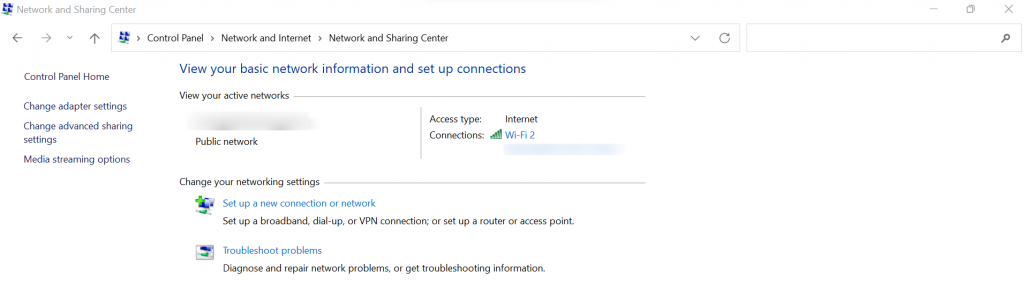
Using Windows, go to Control Panel after that click on Network and Internet and then hop onto Network and Sharing Center, followed by choosing Change Adapter Settings:
Changing the network settings of your network adapter.
Choose Properties by right-clicking your active internet connection on the next screen. Click on Properties once again, and then select Internet Protocol Version 4 (TCP/IPv4):
Drop us a line today!
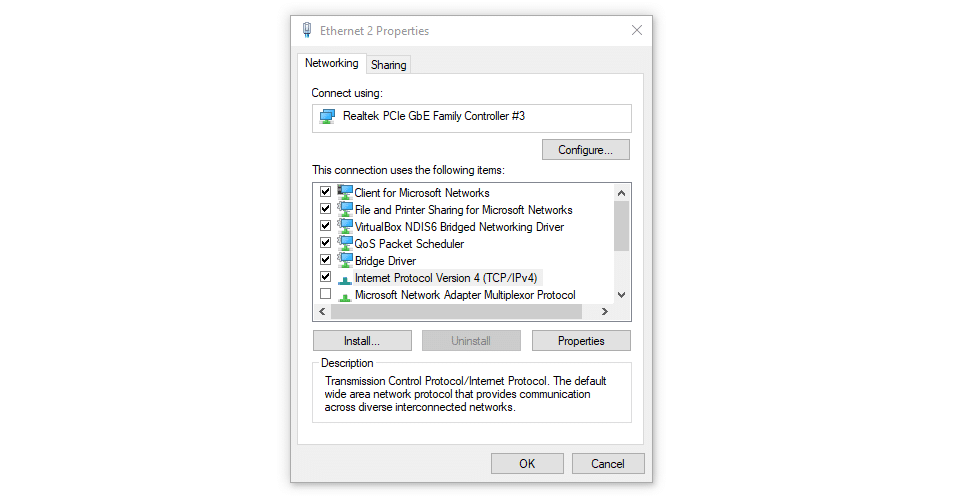
Modifying the properties of your active connection.
It will appear on a new screen with a section for setting your own DNS server address. In the screenshot below, you will find two fields for entering DNS server addresses:
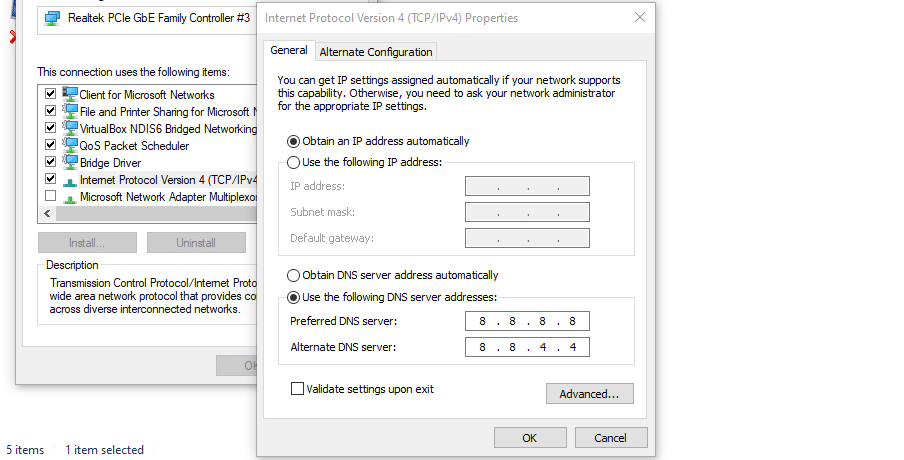
The DNS server settings can be modified.
Mac OS users can edit their DNS settings by going to System Preferences > Network, selecting the network that you want to edit, and then clicking on Advanced. From the DNS tab, follow these steps:
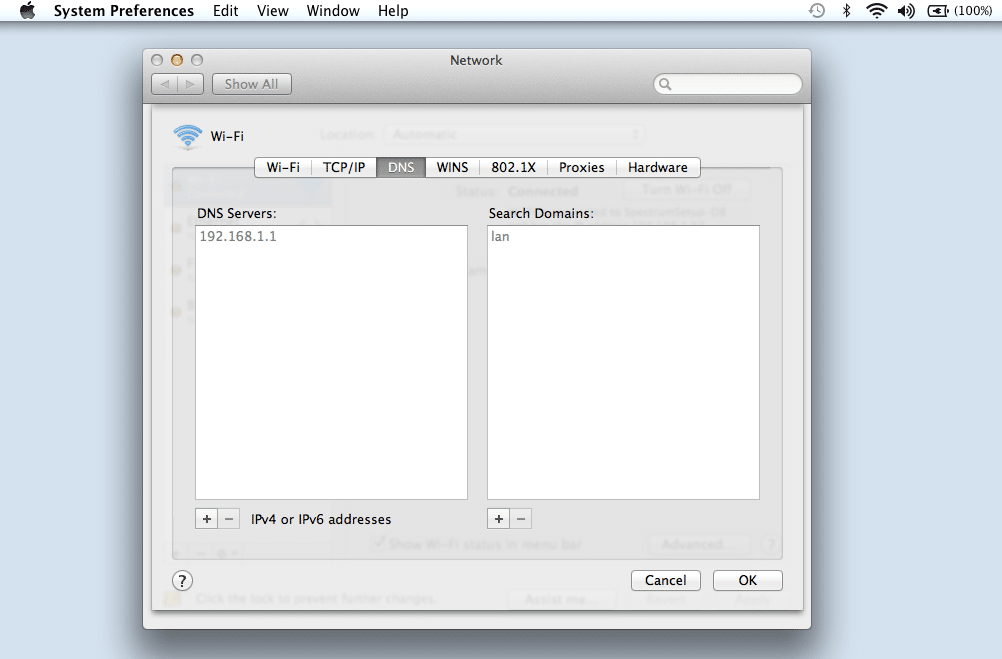
MacOS’ DNS settings can be found in the network settings tab.
The (+) icon allows you to add customized DNS servers. You should be able to access your new DNS settings after hitting the OK button.
You should still have access to your internet, but you should no longer have the “This site can’t be reached” error. If you change your DNS servers, you may be able to load websites faster and view websites you couldn’t before.
About the Author

My name’s Semil Shah, and I pride myself on being the last digital marketer that you’ll ever need. Having worked internationally across agile and disruptive teams from San Fransico to London, I can help you take what you are doing in digital to a whole next level.